People have asked me to explain a bit more about how I knock out my pink paper backgrounds from around my pastel drawings, like the one above (see Working on the Scans), without losing the detail. Which means this is going to be full of computer stuff, so if that's not your thing, just close your eyes and it won't last long...
You'd think I would use the magic wand, but the paper texture creates problems, and a higher setting grabs too much image. I use select, colour range instead. However, that still picks up any spots of pink paper showing through the image, so I first use the selection tool to deselect the main body of the image.
 So that nothing is final, I don't actually delete the background at this stage, but create a layer mask of it, which can then be adjusted.
Because I only made a rough selection with the selection tool, there is always work to be done around the image edges, putting back any pinkish coloured areas. I also need to tidy up any unwanted pastel smudging or splodging. This is where the layer mask is essential. I touch up using a combination of mask tools: a solid pencil and a brush set to dissolve.
I create a new layer in an arbitary, midtone colour beneath my work, to test how things are looking as, in the final book, the vignette won't generally be seen on white, but on a colour.
 Once the cut-out is satisfactory, I use the clone stamp to brush over places around the pastel-textured edge where there is unwanted pencil line showing, from my original guide-line, or any other colour anomolies.
I save the image with the mask layer still in place, so that the colour of shadows (or smoke, like in these examples) can still be easily adjusted, depending on the colour background that is finally chosen to sit beneath the illustration.
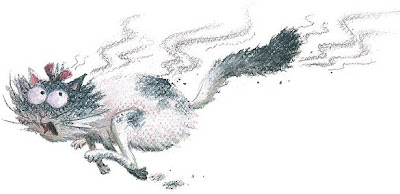
By the way, the illustrations here are more characters from the batch of scans I am working on as we speak, for the story Dragon's Dinner by Susannah Corbett, due out next year.
I create a new layer in an arbitary, midtone colour beneath my work, to test how things are looking as, in the final book, the vignette won't generally be seen on white, but on a colour.
 Once the cut-out is satisfactory, I use the clone stamp to brush over places around the pastel-textured edge where there is unwanted pencil line showing, from my original guide-line, or any other colour anomolies.
I save the image with the mask layer still in place, so that the colour of shadows (or smoke, like in these examples) can still be easily adjusted, depending on the colour background that is finally chosen to sit beneath the illustration.
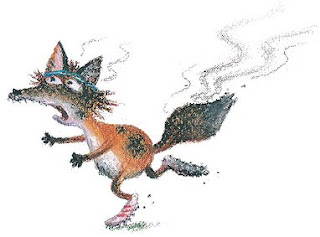
By the way, the illustrations here are more characters from the batch of scans I am working on as we speak, for the story Dragon's Dinner by Susannah Corbett, due out next year.
4 comments:
Maybe I'm too tired, but that was as clear as the proverbial mud!
I've never worked in a layer mask. I'll investigate that the next time I want to remove a background :O)
Layer masks really make a difference - you work with just black and white, black to paint the mask on, white to take it off again and reinstate areas of your image. It means that nothing is deleted, even after you close down and come back.
Experiment with making a selection with the lasso tool, then hitting the 'mask' icon in the layers palette.
Sorry Granny Grimble - I did warn you it would be like that! Photoshop is so complicated that I have to assume familiarity with the various tools, otherwise it would take pages to explain.
Don't worry about it - you'll probably never need to do the above. But I would recommend experimenting with layer masks (see last comment).
Post a Comment