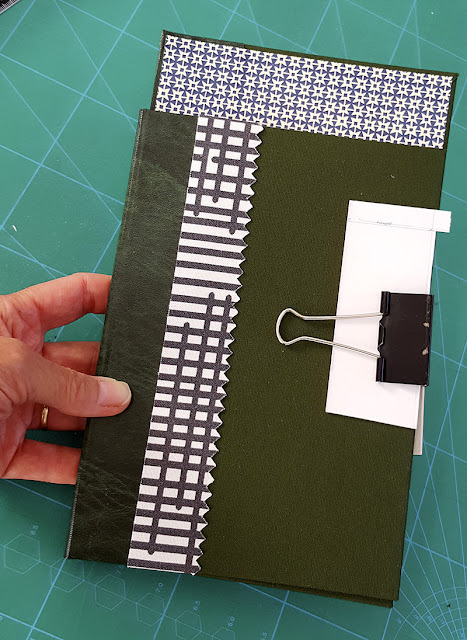
I am starting my new Dementia research-sketching job next week! It's not blocks of time, like last year's residency: it's odd days dotted around randomly, but the first one is on Monday. So I need sketchbooks to draw in...
All the concertinas that I made for the residency got used up, so I had to make a new batch. Also a new cover, as the residency one was used almost to destruction. The 2m long concertinas I created previously had to be made from a big roll, and that was a bit of a performance. Plus I won't need so many this time, so I decided to make shorter ones, using regular sheets. I thought you might like to know the details, in case you fancy making some for yourself.
I bought full imperial sheets of Bockingford paper, which are 30 x 22inches. I started with the 300gm, but it felt overkill for the shorter length books, so I started using the 190gm instead, which is much easier to fold.
I got 3 books out of each sheet. From the 22 inch, short side of the sheet, I measured for three strips (3 x 7.4 inches), for the height of each concertina. Then I measured down the longer edge, for the folds. Allowing for each facet to be 5 inches, you get 6 facets per book.
The trick is to score and fold the whole sheet at once, before cutting it into strips. This saves a lot of time. You only score every other fold by the way, because the folds are going to go in opposite directions. You can easily hand-fold the ones going the other way, once you've folded the scored ones. Make sense?
Then you flatten out the sheet again and use a long ruler to cut it into the 3 strips. They are only short, but will still work fine.
I made my cover the same way as before, but with the little embellishment of a decorative fabric strip you can see in the top picture, plus another more important modification: I extended the back cover by 1.5 inches, so that I could clip on a water container. It's actually designed for oil painting, for oil and turps, but the two little tubs will be perfect for dirty and clean water and mean I can paint more easily in awkward places where I need to stand.
They have a clip on the back which fits just right on the board - good and tight.
While I was in sketchbook-making mode, I played with some different sizes. I cut the paper differently and got different shaped books. Out of the same imperial sheet, I got two books of 6 inches x 9 inches, plus one diddy, landscape-format book from the waste, which measures 4 inches x 6 inches.
I had to make covers to fit them too. I did the water-extension for the big one, but decided to keep the little one more compact, for slipping in a rucksack when we go out walking.
The great thing about this system is that you can use the cover over and over - you just pop in a new strip of paper. You can use an elastic band to hold the book shut when you're not using it. I did away with the fancy Velcro tab I used before: I quickly lost the tab!
You are supposed to use book board to make the covers, but I ran out, so I used regular mount board, which worked fine except for a very slight warping, which I put right by clipping the cover shut while it was drying (using a couple of bits of scrap card to protect it from getting dints from the clip):
The other thing I didn't bother with was the card insert on the back cover, for sliding the concertina paper into. I found that I generally wanted to fold the paper in different ways as I was working, so I could paint on more than 2 facets at once, which meant I stopped using the insert. It works perfectly well just tucked in loose.


10 comments:
Great stuff! For people who get a bit too precious about making their sketchbooks perfect, this is nice and clear.Thanks. :-)
Terrific, Lynn, I've bookmarked it to share!
Have fun!
Brilliant, I will have to try the extension! Thanks for sharing! Also, I was wondering if the warp of your board is because of the grain direction not running parallel to the spine?
Thanks for sharing. Two questions : where does the paper slip into at the back, & where do you have your watercolours when sketching in awkward places ?
Thank you.
Miriam - it's because or the wet glue. The clip corrected it in half an hour though.
Molon- the paper doesn't slip in on this model - follow the link to the earlier post about that.
Great post! I am actually getting ready to across this information, It's very helpful for this blog.Also great with all of the valuable information you have Keep up the good work you are doing well.
Informatica Training in Chennai
Thats great! Thanks:-)
I SO adore your blog.
Do you think there is a chance you could enlarge your font slightly?
I find the posts difficult to read because of how small the print is.
I'm sorry you are having difficulty Ginny. I write in a slightly smaller font because some of the posts can be a bit long. I have never had any body mention it before. Thank you for the feedback- I will give it thought!
Post a Comment