Showing posts with label making sketchbooks. Show all posts

Sunday, 11 November 2018

Making More Concertina Sketchbooks


This morning, I am making lots of mini-concertinas of watercolour paper, because my next residency, with York University, starts first thing Monday morning! This time I am part of a project which is researching the strategies hospitals use to try and combat cross-infection between sufferers of Cystic Fibrosis. 


We have had a couple of meetings, so I know a little more about it than I did, but I will learn plenty more as we go along. Basically, there are a few specific infections which the rest of us shake off, which people with CF can never get rid of, and which will ultimately kill them. If one CF sufferer already has something nasty, hospitals have to make sure that it's not passed on to other sufferers when they come into the hospital for their appointments.

The project is going to talk to individual patients at hospitals in Leeds, Liverpool and York, while I sketch, to discover how they feel the 'segregation' strategies work for them and what the environment feels like from their perspective.


Anyway, if you are also a sketcher, I thought you might like to have a go at making some easy mini-concertinas at home. This time I am making them from standard sheets (76cm x 55cm) rather than from a roll, which is much more straight forward. 


You start by scoring, ready for the folds. Working down the longer side of the paper, measure and lightly mark at 30.5cm and again at 61cm. Do this top and bottom, then score down right across the sheet at the two sets of marks. I have a special scoring tool, which is very handy, but a dead biro will work just as well.

Next measure along the shorter sides: mark at 22cm and again at 44cm. Now you cut along the length of the sheet at those marks, so you have 3 strips: 


Two of them will fold up to something that is close to an A5 sketchbook. The thinner strip is 'waste' as far as my residency project goes, but makes and excellent little landscape concertina book.

Now the folding. You have only scored every other fold, because they go in different directions (which would have meant scoring on different sides of the paper). So, taking your first strip, fold at the two score lines:


You create the additional folds without scoring. Gently bend the paper, to line up the two existing folds. 


When the edges are lined up, use your palm to press the fold in place, then run your finger down to firm it up. Do this again for the final fold and you have your finished concertina, with 5 facets on each side:


I have already made a cover which fits this size concertina - it was the one I made for my Australian residency, with the Centre for Transformative Work Design in Perth. I created detailed instruction for how to make the covers, when I did my initial residency with the Morgan Centre. Take a look here at how to do it. It's not difficult and, once you have it, you can use it over and over again, as long as you cut the concertinas to the same size.

Right, I'm more or less set for my residency now. Later this afternoon, I take a train to Liverpool, where I am staying overnight in a hotel, ready for an early start at the Heart and Chest Hospital in the morning. I will be sketching two different patients in the morning, then spending the afternoon sketching around areas of the hospital which have come up in the interviews. Wish me luck!


Monday, 12 February 2018

Australian Residency - First Week!


Well. Where to begin? I can’t believe that we’ve been in Australia for over 3 weeks already.


John and I had a holiday at the beach for our first fortnight, enjoying the sunshine at Peaceful Bay and not missing the cold, wet, dark winter at home at all. I did these sketches there. 


Then we caught the bus to Perth and got settled into our home for the next 2 months – a lovely, old house with a pretty picket fence and a little back garden complete with a lemon tree. 


Then last Tuesday was the 1st official day of my residency. Really exciting. I got to meet all the team at the Work Design research centre (part of the University of Western Australia), who all seem lovely and really excited about the work we will be doing. I was shown to my very own office and a lovely pile of art materials, just waiting for me. 


There was no sketching for a while though - I spent most of that first day working out how to get the best out of the two huge rolls of watercolour paper they bought for me, and setting up a temporary workstation in the lobby, because you need such a big space to make the sketchbooks


It then took John and myself 3 solid days to wrestle with the watercolour paper (it’s VERY springy when it’s rolled), to cut it into strips and laboriously fold them all into the concertina sketchbooks I am going to use. 


Then I made the detachable cover. I actually used my own blog post from when I was preparing for the Manchester residency, to remind myself how to do it! As well as helping to make the sketchbooks, John filmed the whole process. He is not allowed to be paid for his work, because he doesn’t have a work visa, but he is going to accompany me on lots of the sketching trips, as the informal camera-man, keeping a video record, so we can cut together a film at the end.


Making the books was surprisingly physically demanding and we went home every night feeling pretty shattered. That was fine though – we loved every minute. It is a really gorgeous place to work too: all huge glass windows looking out on bright blue skies and the wide river. We had a tour of the campus on Friday afternoon. It’s huge and equally lovely: wonderfully green and alive with exotic birds.


I began the sketching part of the residency bright and early on Monday morning, but I’m going to keep you in suspense for a day or two and show you how I got on next time.

Sunday, 26 February 2017

Making New Mini-Concertina Sketchbooks


I am starting my new Dementia research-sketching job next week! It's not blocks of time, like last year's residency: it's odd days dotted around randomly, but the first one is on Monday. So I need sketchbooks to draw in...


All the concertinas that I made for the residency got used up, so I had to make a new batch. Also a new cover, as the residency one was used almost to destruction. The 2m long concertinas I created previously had to be made from a big roll, and that was a bit of a performance. Plus I won't need so many this time, so I decided to make shorter ones, using regular sheets. I thought you might like to know the details, in case you fancy making some for yourself.

I bought full imperial sheets of Bockingford paper, which are 30 x 22inches. I started with the 300gm, but it felt overkill for the shorter length books, so I started using the 190gm instead, which is much easier to fold.


I got 3 books out of each sheet. From the 22 inch, short side of the sheet, I measured for three strips (3 x 7.4 inches), for the height of each concertina. Then I measured down the longer edge, for the folds. Allowing for each facet to be 5 inches, you get 6 facets per book.


The trick is to score and fold the whole sheet at once, before cutting it into strips. This saves a lot of time. You only score every other fold by the way, because the folds are going to go in opposite directions. You can easily hand-fold the ones going the other way, once you've folded the scored ones. Make sense?


Then you flatten out the sheet again and use a long ruler to cut it into the 3 strips. They are only short, but will still work fine.

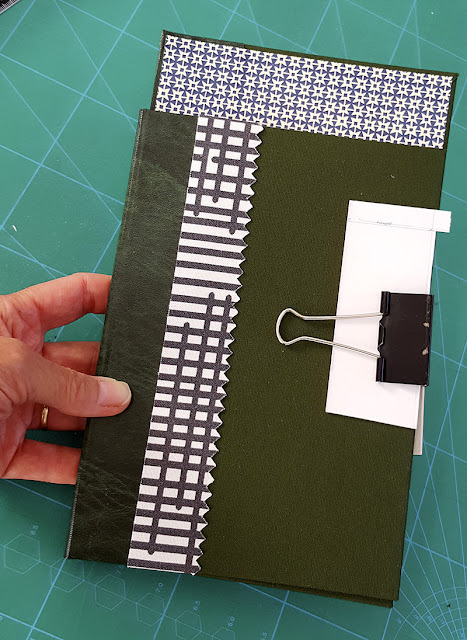
I made my cover the same way as before, but with the little embellishment of a decorative fabric strip you can see in the top picture, plus another more important modification: I extended the back cover by 1.5 inches, so that I could clip on a water container. It's actually designed for oil painting, for oil and turps, but the two little tubs will be perfect for dirty and clean water and mean I can paint more easily in awkward places where I need to stand.


They have a clip on the back which fits just right on the board - good and tight.

While I was in sketchbook-making mode, I played with some different sizes. I cut the paper differently and got different shaped books. Out of the same imperial sheet, I got two books of 6 inches x 9 inches, plus one diddy, landscape-format book from the waste, which measures 4 inches x 6 inches.


I had to make covers to fit them too. I did the water-extension for the big one, but decided to keep the little one more compact, for slipping in a rucksack when we go out walking.


The great thing about this system is that you can use the cover over and over - you just pop in a new strip of paper. You can use an elastic band to hold the book shut when you're not using it. I did away with the fancy Velcro tab I used before: I quickly lost the tab!


You are supposed to use book board to make the covers, but I ran out, so I used regular mount board, which worked fine except for a very slight warping, which I put right by clipping the cover shut while it was drying (using a couple of bits of scrap card to protect it from getting dints from the clip):


The other thing I didn't bother with was the card insert on the back cover, for sliding the concertina paper into. I found that I generally wanted to fold the paper in different ways as I was working, so I could paint on more than 2 facets at once, which meant I stopped using the insert. It works perfectly well just tucked in loose.

Friday, 20 March 2015

Concertina Sketchbooks: the Clever Details


I have now finished my 35 sketchbooks, ready for my residency at Manchester's Morgan Centre. I don't know if anyone out there is going to have a go at making the books for themselves, but in case you are, here's the final stage of the process.


The cover is more or less done, but two things are missing - we need the card insert, to hold the paper concertinas we created in place, and we need a way of fastening the book closed, because the paper will try to escape and inevitably unravel itself in the most inconvenient places you can imagine.

The insert is very straight forward. I bought a pack of A4 black card from WH Smith, 240g, which was perfect. The insert width needs to be approx 10mm narrower than your back cover board. The height, needs an excess of 30 - 40mm to fold over, both top and bottom. The centre between the folds should measure 5mm more than your concertina-paper height (which should also be about 10mm less than the height of the book cover). Score the excess and fold (gently, rather than tightly):


Test that this does in fact sit neatly into your back cover (I made lots of measuring errors during the course of making the books - it's best to double-check everything).

I tried using double-sided tape to stick the insert into the book at first. I figured that it would be less messy than PVA when trying to position the folded card, but it started to peel up after just a couple of hours, so I went back to PVA. 


I glued the top flap first, positioned it (folded under) on the inside back cover - 5mm from the top and outside edge - then put it under a couple of books to dry (squeeze out and wipe any excess glue first!)

I did the bottom flap once the top was secure. One trick: I was aware of the potential for excess glue to squeeze out underneath at this stage, unseen, and accidentally glue the insert shut, so I slipped a strip of waste card in between, before pressing the glued flap down. 


Again, put books on top to dry, or it springs up.

The end of the concertina-paper can now be slipped under the card and slipped out again when you want to replace your paper. Ingeniously simple solution for refills. I can't take the credit I'm afraid: my clever friend Lucie Golton designed it.


Many people use ribbon to fasten books. I didn't want to drill holes in the cover through, as it acts as a mini drawing board when I am using the book, so I wanted it unsullied. John came up with the Velcro system. I was going to buy Velcro tape, then discovered these nifty little guys:


Perfect. You pop one fuzzy spot onto the book, back and front, then attach the loopy halves onto a short strap, which I made from vinyl to match the spine. 


I just cut a piece of vinyl twice as wide as needed and 10mm longer each end, cut across the corners, then folded it in on itself, using PVA again. 

The beauty of the Velcro is that, when the book is in use, if the unfastened strap gets in the way, you can detach it and stick it back on at 90 degrees. You don't lose it, but it doesn't keep flapping and springing around the edges your paper.

If you found this project useful and want to check out other handy posts, try using the Hot Tips label on the right. I add the label to anything I think might be helpful to other people. It's a bit of a mix, with other ways of home-binding sketchbooks, but also tips for building up an illustration folio, how to do a school visit, create a 'Flat Plan' to plan out a book, or how to use  / where to buy particular art materials. All sorts. 

Monday, 16 March 2015

Concertina Sketchbooks: Making Detachable Covers


The covers are done - hurrah! Making them isn't as tricky as you think, honest. You need:

Book board: warps less, but any thick board could be substituted I guess. 
PVA glue and a biggish brush (don't let it dry on the brush!).
Cloth: I've used regular cotton before, but book cloth is stiff and paper-backed, so easier.
Book vinyl: for the spine (though again you could try other materials).
Endpapers: any thickish, patterned paper works.
Medium weight card: a small piece to create a flap, to hold the folded paper in place.

You also need lots of scrap paper, to help create both a clean and a 'gluey' work area, side by side.


I started by cutting 2 pieces of book board: you need to allow 5mm more than your folded paper inner all round. I then cut 2 pieces of book cloth, allowing about 20mm overlap on three sides, but cutting it 20mm short on the spine edge. You stick the book cloth pieces to the boards (it's easier to apply the glue to the board, rather than the book cloth):


You turn it over and cut off the corners, snipping within 2mm of the board corners:


Then you glue all the excess cloth edges and stick them down, making sure to pull the cloth tight over the board edges (sorry, just realised this photo is up the other way - bit confusing, but you get the idea):


The corners are slightly tricky (this is where the book cloth really helps). You use your thumbnail to tuck the cloth into the corner on one side, then fold the other edge over to seal a neat corner:


Next comes the spine. I measured the width of my folded-up paper inner at 15mm. I didn't squeeze the paper too tight, so it wouldn't be under too much pressure and the book would close more easily. 

This is where the vinyl comes in: you need a piece to join the two boards together and create a strong spine. Book vinyl is great as it's very strong but also takes pencil on the reverse, so it's easy to measure and cut to size. 


I measured 35mm, to stick to each board, plus the 15mm spine, so 85mm wide. It needed to be as long as the board height, plus an extra 20mm top and bottom to fold over. I drew all this onto the vinyl, so it was easier to line things up when sticking on the boards: 


I put PVA glue onto the vinyl one half at a time, placing each board so it sat within my pencil lines, until it all looked like this:


Then I glued the excess vinyl top and bottom and folded it over, making sure it was pushed well into the spine. 

I then cut another strip of vinyl to go on the spine's inside. That needs to be just 1mm shorter than the book height, both top and bottom, and roughly the same 85mm width. When you glue that on, you need to really push it into the spine edges, so it's snug against the board and stuck tight to the other piece of vinyl:


There is a book-binder's tool which is designed for that job, but there are plenty of things which will do the trick, including a thumbnail.


Then you do the endpapers. You would normally stick the paper to both sides but, in this case, the inside back cover is going to be completely obscured by the flap we need to make, to slip the paper insert into. You just need to cover the front. Measure a piece that is 4 - 5mm smaller than the front cover all round and stick it on.


You're nearly there now. I'll tell you how to make the card insert next time, as this is turning into a very long post.

Saturday, 14 March 2015

Concertina Sketchbooks - Folding and Sticking!


Yesterday afternoon, John and I cut up the very last section of the huge roll of paper for my concertina-format sketchbooks. It's been quite a marathon task, but I now have sketchbook paper coming out of my ears. It has mostly landed on my already full desk, where it is perched on top of all the tagged and numbered sketchbooks, which are still waiting to be scanned for my Urban Sketching book


So, now I have to gird my lions for all the folding. The ones I folded on Wednesday have been sitting under piles of heavy books ever since. They do seem a little tamer for it:


I have folded 10 so far, so still another 25 to go. 

I have made a start on the detachable covers too. There are two to make, as there are two different sizes of paper. This was because the size I wanted to create didn't fit exactly into the width of the roll. Which meant that I got 30 sketchbooks at the 21.5 x 14 size, then another 5 from the 'excess' edge of the roll which were squarer, at 17.5 x 14. 

I made a test one first, to fit a Moleskin-size, just to get the technique right. It worked really well. I bought some proper book-cloth specifically for this project, which was a great idea, as it cuts and sticks down very much easier than regular cloth. I also chose a snazzy print for the endpapers. This time, because I had a budget, I bought the proper stuff, rather than using gift-wrap, like I did for the Japanese bound ones:


Because the 300gsm paper folds up into quite a thick book, I had to create a reasonable sized spine for my covers, which I have done with a book vinyl. This is the inside of one of the covers so far:


In case people want to try making some for themselves, I have taking photos at the various stages to show you, but that's for next time.

Wednesday, 11 March 2015

How to Make 35 Concertina Sketchbooks!


Although my residency doesn't start until the autumn, I wanted to get the sketchbooks made well in advance, in case of difficulties. So, a couple of weeks ago, a HUGE roll of watercolour paper arrived in the post. It was 10m long and over 1.5m wide: a bit of a nightmare to manoeuvre, but perfect for making concertina books, as you don't need any joins (usually the trickiest bit).

This morning we got stuck in!

We had to pull a 6ft table up alongside my work bench, just to have somewhere big enough to cope with rolling the paper out so we could work with it. Everything had to be scrupulously clean too - another nightmare.


I had worked out that I would get 7 sketchbooks out of the roll's width, each a max of 2m long (so they would not be too unwieldy to exhibit at the university, when I'm done at the end of the residency). Given the roll's 10m length, that meant 5 sets of 7, so 35 books in total.

I decided to cut a couple of the 2m lengths from the roll first, to make things more manageable. I had intended to get the lighter weight paper I usually work on, but at the last minute went for the 140lb instead, so the finished lengths will be more sturdy. Trouble is, that weight means the paper is really springy, so absolutely everything was a two-man job. Thank goodness for John!


I thought long and hard about the order of things and realised that it made sense to do all the scoring (for the folds) before cutting the paper into the separate books. That way I could score across all 7 books at the same time, with only one lot of measuring. The books are going to be 14cm x 21.5cm, but you only need scores for alternate folds (because the folds go in 2 different directions), so we began by measuring out 28cm intervals down each of the 2m lengths.


The book-binder's devise I used on my last sketchbook experiment seemed a bit thick to be accurate enough for a long concertina (where any errors quickly multiply), so I sanded the sharpness off a bamboo pen, which was perfect. We didn't have a ruler long enough to straddle the complete 1.5m width, but John dug out a really long spirit level: 


That too needed a jolly good wash but, once clean enough, it saved a lot of time at the scoring stage, as we only had to measure up each edge of the paper and not in the middle too.


I had tried to use the spirit-level as a straight-edge for cutting across the width, but that was a BIG MISTAKE. It's depth interfered with the handle of the knife and so I have one rather raggedy cut, before I realised the problem. Ah well - it's a learning process.

Next job was to mark the width with the 12.5cm intervals, ready to cut the paper into strips for the separate books. It would have been really easy to mis-measure, so again I was glad to have my man-servant with me, double-checking as we went along. I was still rather nervous when I actually began cutting: 


We had to get 3 separate cutting mats lined up along the bench, because of the ridiculous size of the paper. It worked a treat though. By mid afternoon, we had curls of watercolour paper perched all over the studio, ready for folding:


I worked down the length of each book, folding at the scored lines we had created every 28cm: 


I lined up the in-between folds by eye, working without pre-measured scores, so that I could try and make sure the concertina didn't wander too far off square: 


The thicker paper took a bit more man-handling and got chunky quite quickly, which was another reason I limited the length to 2m: 14 'pages' of 14cm. 300gsm paper certainly has very strong opinions of its own, so the experience was a bit like wrestling an octopus at times. The folded books are still pretty springy and rather keen to explode - I have put them under heavy books to see if that tames them at all.


So that's the papers for 14 books done so far. I'll tackle another batch tomorrow, while I remember how we did it (and while the studio is clean). Although I must also get on with my book. Eek!

Plus I also have to make a cover for the sketchbooks. Instead of individual covers for each book, which would take ages, I was given a great idea by my sketch-buddy Lucie Golton: a detachable cover which you use again and again. She made me one as a present a while back, so I can copy her system. Thanks so much Lucie! 


I'll take some pictures as I make the cover, as well as showing you the finished item, but that's for next time.